SikuliX - general aspects of scripting
What is a SikuliX script
A SikuliX script is a workflow, that tries to perform actions against the GUI seen on a real screen, that otherwise must be performed manually. Usually it is a series of waiting for images to get visible on the screen and actions (mouse and/or keyboard) on visible GUI elements. The workflow statements usually are complemented with other elements of the used scripting language to implement more complex solutions with decisions, repetitions and states.
Example in Python language
while True: # repeat the body forever
    wait("image1.png", 10) # wait max 10 seconds for image1 to get visible, otherwise die
    click("button1.png") # click the button given by image button1
    if exists("image2.png"): # wait max 3 seconds for image2 to get visible, return True or False
       doSomething() # in case True execute function doSomething (defined somewhere else)
    else:
       break # in case False get out of the loop, which ends the workflow
    # start all over with the line after the while
# the end of the workflow
In the IDE as standard the “foobar.png” are shown as thumbnails of the images (other options available).
To write, execute and debug SikuliX scripts you should know about the features of SikuliX and have at least a basic knowledge about the used scripting language.
A good starting point is to use the SikuliX IDE, to get used to the SikuliX features.
If things become more complex it might make sense, to switch to another IDE that supports your selected scripting language better.
Where and how can a SikuliX script be stored
A SikuliX script consists of one file containing the statements of your scripted workflow and zero to many image files, that you have captured, to support your workflow.
This bunch of related files is meant when we talk about a SikuliX script.
How to run such a script is shown in the next chapter.
The standard storage for a SikuliX script is a folder/directory having the name that you have given to the script, when saving it from the IDE. It is mandatory, that the contained scriptfile has the same name as the folder, which is guaranteed, when working with the SikuliX IDE. To avoid any problems, you should never directly access the folder content outside the SikuliX IDE, except you really know, what you are doing.
On Mac the folder is seen as a package/bundle, which at the top level in Finder hides the content.
The folder and its content for the above example (in IDE we named it myscript)
myscript.sikuli
    button1.png
    image1.png
    image2.png
    myscript.py
There are two other storage variants for SikuliX scripts: zip-file and jar-file, which are intended for distribution of your scripts. Both variants pack the SikuliX script content in one file, which makes distribution easier. Both variants can be run with the means of SikuliX, as long as the target system has a valid SikuliX installation/setup.
The jar-file variant has an option to be packed together with the scripting and SikuliX feature support (self contained), so it might be run on systems only having a valid Java installation.
variant zip-file
It can be created in the SikuliX IDE with the file menu entry “Export packed source” and gets the ending .skl instead of .sikuli. As such it cannot be reopened for editing nor used for import, it can only be run using SikuliX features on systems having a valid SikuliX setup. In fact it is simply a zip-file, which can be brought back to a .sikuli folder using a zip utility. So be aware, that this variant does not really hide your script content.
variant jar-file (only available in 1.1.2+)
It can be created in the SikuliX IDE (file menu entry “Export as jar”). It can be run using SikuliX features on systems having a valid SikuliX setup. The script source is contained in compiled form (Java byte code) and hence not visible, even if one accesses the jar content. So this variant gives some level of secrecy for your scripted workflow.
There is a sub-variant, containing the scripting and SikuliX feature support additionally to the script content, which makes it runnable even on systems not having a valid SikuliX setup, but only a valid Java installation. Be aware, that such a jar has at least 60 MB though. How to make and use it look here.
How to run a SikuliX script
In the SikuliX IDE a currently open script in the frontmost editor tab can be run by clicking the run button.
Saved scripts (.sikuli) and exported scripts (.skl and .jar) can be run from commandline (see) or from within other scripts (see).
Using JavaScript
One can use JavaScript for scripting with SikuliX features.
The support for JavaScript is based on the Java integrated engine Nashorn (available since Java 7).
BE AWARE Since Java 11 Nashorn is marked deprecated and might be removed in a future Java version. With Java 13 (available September 2019) it is still there and hence will be there till September 2020.
A candidate to be used with SikuliX and JavaScript scripting in the future will be the GraalVM package. People who try already now with SikuliX 2.0.4+ are welcome to give feedback about their experiences on GitHub.
- The easiest approach for JavaScript scripting:
switch a new editor tab in the IDE to type JavaScript (rigt-click on an empty Tab, select
Set Typein the context menü and then selectjavascriptfrom the drop down list).The bottom status line at the right side now will show
(javascript)now you can write JavaScript code according to the specifications of the Java bundled JavaScript interpreter (Nashorn since Java 1.7).
before running the script the first time, you have to save it
Example:
Debug.user("hello from JavaScript");
var img = "img.png";
hover(img); // uses Screen(0) like in Python
var scr = new Screen();
print(scr);
scr.hover(img); // uses the Region scr
- The SikuliX features in general have to be used like in Java programming.
All classes from
org.sikuli.scriptare known (pre-imported).DebugandSettingsare also known.
the following undotted methods work on Screen(0):
wait, waitVanish, exists, click, doubleClick, rightClick, hover
and you have undotted:
type, write, paste, run
- Be aware:
FindFailed is not thrown! internally returns null!
If you want to catch exceptions, you have to use the dotted methods.
Using Jython and Python
Setup your own Jython environment
Out of the box, SikuliX can be setup with a Jython standalone package, which then is only available to SikuliX to run scripts in SikuliX IDE or from commandline using SikuliX.
If you want to use the Jython REPL (interactive commandline) or another IDE like PyCharm, you have to install Jython seperately. In this case no need to have the Jython standalone package, but you can tell SikuliX to use your installed Jython environment:
This only applies to SikuliX 2.0.x+
Previous versions 1.1.x might make problems and are no longer supported
MANDATORY: use Jython 2.7.1
Make sure you have a valid Java installation (version 8+)
Note for Mac OSX
If you ever encounter an error like ValueError: unknown locale: UTF-8, then take care, that your environment at runtime of Jython contains these 2 entries:
LC_ALL=en_US.UTF-8
LANG=en_US.UTF-8
You might use export or any other appropriate method.
Apply the following steps, to get a Jython environment, that can be used with SikuliX:
download the installer package from Jython 2.7.1 Installer
install (usually by double-clicking the package) using the standard setup into an empty folder
test by running
<jython-folder>/bin/jythonfrom a commandline, which should open an interactive Jython session, that allows, to run Python statements line by linemake sure, that pip and easy_install are available:
<jython-folder>/bin/pipexists
<jython-folder>/bin/easy_installexistsif this is not the case run
<jython-folder>/bin/jython -m ensurepipon a commandline and check againif you do not get pip ready, don’t bother: Jython is useable without it. The caveat: any additional packages have to be installed/setup manually.
Additional stuff, if you succeeded with pip:
run
<jython-folder>/bin/pip install jipto install the packagejip, which allows to add Java libraries easily to your Jython environmentadd any needed Python package (must not depend on C-based stuff) using
pip,easy-installor manual methods into
<jython-folder>/Lib/site-packagesand/or usejipfor adding Java libraries preferably from Maven Central
Usage with SikuliX — Case 1: Using Jython from commandline or in a Python IDE
You can run SikuliX scripts using <path-to-jython>/bin/jython <path-to-youNameIt.sikuli>/youNameIt.py.
In a Python IDE you have to setup your project according to the rules.
- Prereqisites:
sikulixapi.jar(NOT sikulix.jar!) must be on the Java classpath at runtime. This can be achieved using one of the methods that come with Jython or the IDE.to give access to the images use the appropriate features of
ImagePath:setBundlePath()and add()
If this case is planned to be your main usage, you should decide to use plain .py files according to the Python script/module rules and the ImagePath features to acces your images.
You can use the SikuliX IDE to capture your images even in plain .py files (see plain .py in IDE).
If you want to run scripts from within the SikuliX IDE or from commandline using SikuliX, just open and run the main script unchanged (see plain .py in IDE).
Usage with SikuliX — Case 2: Using the installed Jython with SikuliX
You have to tell SikuliX about your installed Jython by using the Extensions feature:
start the IDE once and ignore all error messages and close it again
in the
SikuliX-APP-DATa-foldergo to the folderExtensionsedit the file extensions.txt to point to your Jython install
start the IDE again - you should get to the normal state (a tab
Untitledwith typejython)
Access Python packages from SikuliX scripts run by SikuliX (GUI or commandline)
The following approaches apply to situations, where you want to use Python modules installed somewhere on your system, without the need to manipulate sys.path,
meaning, that when using ìmport moduleXYZ this package is found automatically.
SikuliX uses a central repository (SikulixRepo in the following) for internal stuff (native libraries, downloaded artifacts,
resources needed at runtime and simailar things). This is a folder in the user’s private space (home folder) look here:
Windows:
%APPDATA%\SikulixMac:
~/Library/Application Support/SikulixLinux:
~/.Sikulix
- Basic preparation
To
SikulixRepoadd a folderLiband inside addsite-packages(usually already there)- Approach 1
Since an existing folder
SikulixRepo/Lib/site-packageswill be recognized and added automatically as the1st entry to sys.path, modules/packages contained in here will be found when imported without any further preperations. This approach can be used, to “overwrite” modules/packages, that otherwise would be found elsewhere onsys.path(e.g. for testing)- Approach 2
In the folder
SikulixRepo/Lib/site-packageshave a filesites.txt, that contains absolute paths one per line, that point to other places, where modules packages can be found. These paths will be added automatically at startup to theend of sys.pathin the given sequence.
Prepare and use your own jar files in the Jython environment
You might prepare jar files containing Python scripts/modules/packages, Java classes and other stuff like images, that are intended to be used in the scripting context.
- possible use cases
you want to pack scripted stuff together with other resources into a container ready to be used by yourself or others via import (which is not supported by the .skl packaging method).
you want to secure your script code against modifications by others, that use your distributed jar.
Later (possibly only with version 2) there will be a feature available, to run such script containers directly from commandline (java -jar mystuff.jar parameters) or by double clicking.
typical jar file structure:
-- jar rootlevel
module1.py    # Python module
module2.py
- folder1     # Python package
  __init__.py
  stuff1.py
  stuff2.py
- images      # image folder
  img1.png
  img2.png
- org         # Java package
  - mystuff
    class1.class
    class1.class
how to pack such a jar
You might use the Java jar utility (contained in the JDK).
Or use the SikuliX provided feature Sikulix.buildJarFromFolder(jarpath, folder), where jarpath is the absolute path to the jar (the parent folder must exist, the jar is overwritten), that should be created and folder is the absolute path to a folder, containing the stuff to be packed. The content of the folder is copied to the root of the created jar.
Just run Sikulix.buildJarFromFolder(jarpath, folder) in an empty tab in the IDE or in a script, that might do some pre- and/or postprocessing.
If the folder contains an __init__.py on the first level, the given folder is taken as a Python package and as such copied to the root level of the jar, to preserve the package context:
-- packagefolder
  __init__.py
  stuff.py

becomes a jar
-- jar rootlevel
- packagefolder
  __init__.py
  stuff.py
- how to secure your script code using the jar packaging
Step 1: prepare a folder as in the previous chapter
Step 2: compile the folder into a new folder (see below)
Step 3: pack the new folder into a jar for distribution
Run in an empty IDE tab or as part of a script:
Sikulix.compileJythonFolder(sourcefolder, targetfolder)
copies the complete content from sourcefolder to targetfolder (the parent folder must exist, the folder is emptied if exists) and then traverses the targetfolder replacing each foobar.py with it’s compiled version foobar$py.class, that contains JVM-byte-code, so your script code cannot be edited anymore in this targetfolder, but still be used with import foobar.
Be aware: Be sure, your code compiles without errors, because the compile feature either succeeds or fails (compile errors), but you will not get any information about the cause or even the place of the compile problem.
Using SikuliX with real C-based Python (version 2.7 up to 3.7 latest)
This feature is under development (see on GitHub: `sikulix4python<https://github.com/RaiMan/sikulix4python>`_ for details and status)
Comments and ideas are welcome and can be posted there as issues.
Scripting with IntelliJ PyCharm and IDEA with Python plugin
- BE AWARE
you will not see any image thumbnails as in the SikuliX IDE
capturing of your images has to be done with the SikuliX IDE separately into special image scripts/folders, that have to be applied to your scripts using the ImagePath features
code completion will not work, since most features are at the Java level and the undotted Region/Screen funtions (find, click, …) are only created dynamically at runtime of the script and hence not accessible in the static editor environment
so in the end the only advantages over the SikuliX IDE are:
- a full featured editor and at least syntax evaluation
- a full featured debugger, where you can even inspect down into the Java level at a breakpoint
Among the free IDE’s, that allow to work with Python projects, I made the best experiences over the years with JetBrains’s PyCharm (using the free Community Edition) or the Python plugin in JetBrain’s IntelliJ IDEA.
PyCharm has a weakness, in that code completion while editing does not look into jar-files nor Java classes, while in the built-in Python console after having imported a Java class, code completion about the class attributes/methods works, so having a console open while editing might help as a workaround for inspecting Java classes.
IntelliJ IDEA with Python plugin supports complete code completion (while editing and in console) including Java classes, but is a bit more complex to setup and use with just Python.
If you are more used to Eclipse, the Eclipse PyDev might be your choice for Python development. The steps to get it running for use with SikuliX are similar to the following steps for PyCharm. If someone wants to document the details for Eclipse PyDev, he/she is always welcome - I will not do it on my own.
Step 1: get Jython up and running
Just follow the steps mentioned in the chapter Setup a Jython environment above.
Step 2: get PyCharm up and running
Download and install the PyCharm Community Edition.
Step 3a: tell PyCharm to use Jython as interpreter
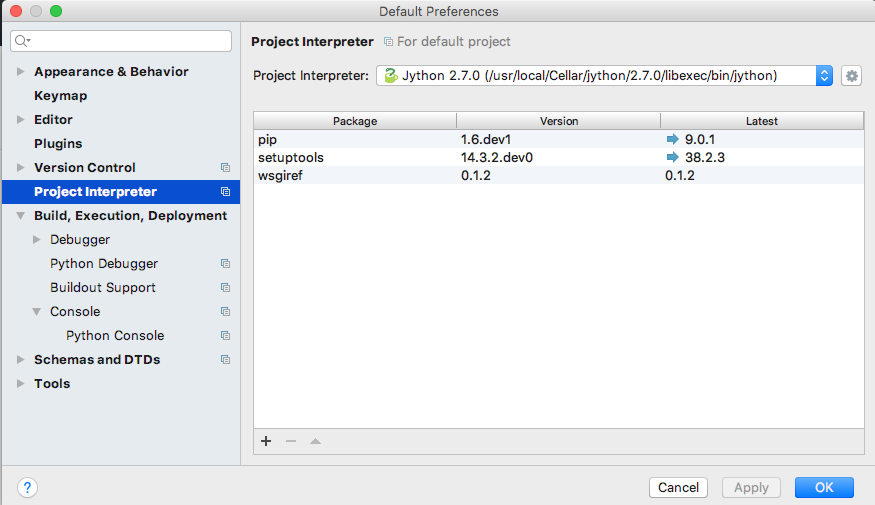
Start PyCharm and make sure to have closed all projects and be in the start-up window titled Welcome to PyCharm.
At bottom right in the menu Configure select Preferences. You should get a dialog window titled Default Preferences.
At the left side select Project Interpreter and choose your installed Jython by pointing to the contained .../bin/jython script/command-file.
Click Apply and watch how the Jython setup is analyzed and implemented in PyCharm. If it worked click Ok.
Step 3b: tell PyCharm to use Python as interpreter
With respect to SikuliX features used in Python scripts look here for details.
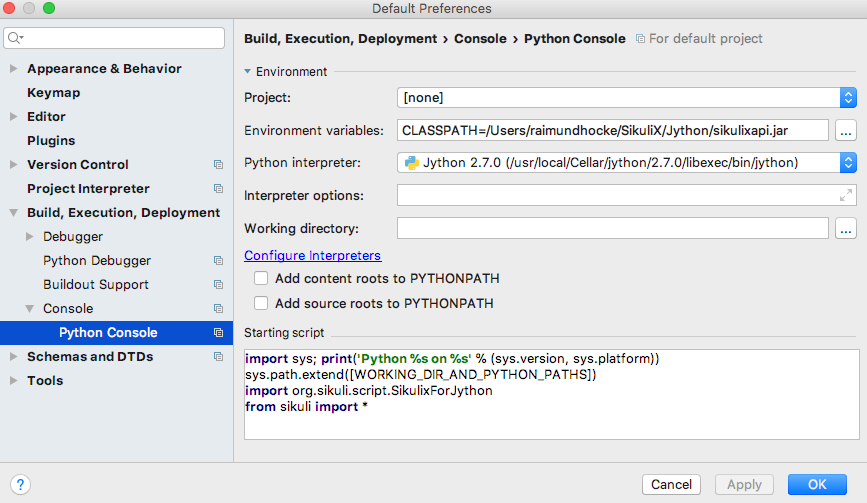
Step 4: setup the environment for a SikuliX-aware Python console
As with the step before get the Default Preferences dialog open.
At the left side select Build, Execution, Deployment… Console… Python Console.
To the Environment variables add antry CLASSPATH, that points to a valid sikulixapi.jar.
In the Starting script you might add the line
`
from sikuli import *
`
so each time you start a console, the prompt is already prepared to know about SikuliX features.
Using Ruby
Using SikuliX in Java programming
To be written - but until then read here
Using SikuliX in non-Java programming scenarios
To be written
Using RobotFramework
BE AWARE: Switched off until further notice — to be implemented as extension
Added in version 2.1.0.
Added in version X1.1.1.
Valid up to version 2.0.x
You can run ready Robot scripts out of the box in the Sikulix context (IDE or from commandline). The needed Python module robot ( from robotframework 3.0 ) is bundled with the sikulixapi.jar. At runtime and already with setup, the module is exported to the folder <SikulixAppData>/Lib, which is on sys.path automatically. So there is no need to have anything else available than a suitable setup of SikuliX.
The easiest way is to use the SikuliX IDE with this principal setup
runScript("""
robot
*** Variables ***
${USERNAME}               demo
${PASSWORD}               mode
${TESTSITE}               http://test.sikuli.de
*** Settings ***
Library           ./inline/LoginLibrary
Test Setup        start firefox and goto testsite    ${TESTSITE}
Test Teardown     stop firefox
*** Test Cases ***
User can log in with correct user and password
    Attempt to Login with Credentials    ${USERNAME}    ${PASSWORD}
    Status Should Be    Accepted
User cannot log in with invalid user or bad password
    Attempt to Login with Credentials    betty    wrong
    Status Should Be    Denied
""")

class LoginLibrary(object):
  def start_firefox_and_goto_testsite(self, page):
    popup("start_firefox_and_goto_testsite")
  def stop_firefox(self):
    popup("stop_firefox")
  def attempt_to_login_with_credentials(self, username, password):
    popup("attempt_to_login_with_credentials")
  def status_should_be(self, expected):
    popup("status_should_be")
the first 2 lines
runScript("""
robot
signal, that you want to run an inline Robot script, that follows on the next lines terminated by """). This construct is a multiline Python comment, that can be used as a string.
BE AWARE In the standard, a report HTML will be automatically opened in the standard browser at termination. If you do not wnat that (e.g. in unattended situations) use this instaed as the first 2 lines. Take care: after robot 1 space, a linefeed directly after silent and nothing else.
runScript("""
robot silent
Normally when working with SikuliX features, you have to do some Robot Keyword implementation at the Python level. To Robot you tell where to find these implementation using the Library setting.
In this case we have the implementations inline in the same scriptfile according to the Robot rules packed into a Python class having the Keyword methods according to the Robot naming conventions. At runtime this class will be exported to a Python file, whose absolute path is then replacing the Library setting.
If you have the Keyword implementations somewhere outside, then you have to put the correct path specification into the Library setting. Another option is to reference a jar file as a Library again according to the Robot specifications.
If you now run the script in the IDE, internally a robot.run will be fired after having setup the script content and the environment. Currently no extra options can be provided for the robot run. As a result you get a folder with the ending .robot named as your script in the same folder as your script folder containing inputs to and the results from the robot run
# supposing the script is named testrobot.sikuli
# then you get a folder testrobot.sikuli.robot with the content
testrobot.robot # the robot script
LoginLibrary.py # the Python Keyword implementations
# the standard Robot outcome
output.xml
log.html
report.html
Still being in the IDE another possible setup would be this way:
robotScript = """
robot
*** Variables ***
${USERNAME}               demo
${PASSWORD}               mode
${TESTSITE}               http://test.sikuli.de
*** Settings ***
Library           /some/path/to/LoginLibrary.py
Test Setup        start firefox and goto testsite    ${TESTSITE}
Test Teardown     stop firefox
*** Test Cases ***
User can log in with correct user and password
    Attempt to Login with Credentials    ${USERNAME}    ${PASSWORD}
    Status Should Be    Accepted
User cannot log in with invalid user or bad password
    Attempt to Login with Credentials    betty    wrong
    Status Should Be    Denied
"""

# here you could do some preprocessing and even modify the above robotscript

runScript(robotscript)

# eventually do something with the result
BE AWARE for the keyword library, the Name in the file name Name.py and the statement class Name() must be the same and start with an uppercase letter.
BE AWARE ON WINDOWS the file path must be escaped with 4 backslashes for each backslash like so C:\\\\Robot\\\\Libraries\\\\Name.py (which leads to the needed 2 backslashes for each backslash as escape in the final robot file)
Of course you can use any other method, to fill a string representing a valid Robot script, provided the first line contains the string robot and only that (denoting the script type for runScript).
If in such a case you want to provide an inline Keyword implementation: this does the trick:
# prepare your script content
runScript("robot\n" + scriptContent)
# eventually do something with the result

# """)

# the rest is taken as inline Keyword implementation
If you have the need to specify extra parameters to the robot.run(), then you still have the option to stay within the SikuliX context (IDE or from commandline):
prepareRobot() # takes care for the correct environment

workdir = getParentFolder()
script = "arobottest/arobottest.robot"
robotscript = os.path.join(workdir, script)

print "*** trying to run:", robotscript
robot.run(robotscript, outputdir=workdir)
A library .py file being either in the script folder itself or in the folder containing the script folder is found automatically. So simply the library name is enough in this case. In all other cases you either have to specify the absolute path off the .py script (take care with windows - see above) or use addImportPath() to add the folder containing the library .py file to sys.path, in which case again only the name is sufficient in the Robot script.
It is strongly recommended, to always specify the outputdir= parameter since otherwise the reportfiles will be written to the working folder (from where you are running), which might not always be what you want.
If you want to use any of these variants outside the SikuliX context (some external Jython or in an IDE like PyCharm) you have to add these 2 lines at the beginning of your main script (as always in such cases):
import org.sikuli.script.SikulixForJython
from sikuli import *
to get the SikuliX context ready.
Experimental: SikulixServer - run scripts from anywhere with zero-delay
Added in version X2.1.0.
This feature is completely revised
The design/implementation goals are here..
… and have to be used as usage guide for now.
